How to make the Promoted Links app fluffy and sexy
- Maarten Boonen
- Sep 24, 2015
- 6 min read
Updated: Aug 10, 2020

Whenever I'm designing the UI and the UX for a SharePoint site clients ask me to make it intuitive and sexy at the sametime. In SharePoint 2013 and Office 365 we have a really cool app called Promoted Links and it can be really handy to make a separate navigation to some tools or functions on your site.

Challenges
The problem with the Promoted Links App is that it's practical and intuitive but far from sexy.
Out-Of-The-Box it will place all the tiles on one horizontal line. The result is that end-users who want it on multiple lines will just create a new promoted links list and place it below the other one.
Another issue is the resizing part of the images. Most of the time end-user don't know the size of the default tile and just upload a photo with the result that the photo will be squished all together and the proportion will make it look ugly.
Solution
Luckily some people created some easy to add scripts (jQuery or CSS) to modify the behavior and look and feel of the promoted links list. Just by adding the script in a script editor web part below the promoted links list or add it to a linked stylesheet. In most of these blogs they show how to resize the tiles and how to cut them off to go to the next line.
To be honest that's what most people want and need. I just decided to take it to the next level and show some extra creative usage to the promoted links list to make it a bit fluffier.
Lets put the fluffiness back in
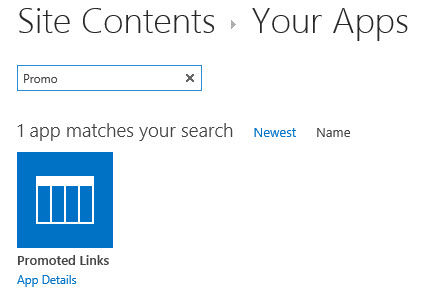
First I would like to start with a tip that most people overlook. When you want to create an app, the app you are looking for can be hard to find. You don't know on which page it is and there are lots of apps to choose from. Just on the top near add an app you have a little search box. By typing part of the name. In this case Promo... it will filter all the apps for you.
Another thing which can be hard is to add tiles to the list or edit them. The Default Tiles view is locked and cannot be modified. You need to select the all promoted links view and choose quick edit to modify them quickly. However you can add the edit button to this view just to modify one item quickly.


Preparation
Most of the time to make it presentable people like to see something different, something new what they haven’t seen before. Just something simple and different is enough.
Start by searching for some photo's that suite the topic of the site and also the colors which are being used.
The default tile size is 160 x 160 pixels or 4.2333333 cm I used a online converter site for this. You can resize a picture and fit exactly in a square shape in PowerPoint. This process is similar to the trick I explained in the perfect round circle post. Only te size of the square shape you get will be in centimeters.
Now a days you can find a lot of handy tools online with cool generators to help you if you don't have the software installed.
PicSlice is for this topic perfect, we can resize, crop and slice the photo exactly to what we need for in the promoted links list.

For this purpose I would recommend to create a image library with a folder which has the name from the promoted links list and keep the images per list in a separate folder.
Fluffy example #1 In this example I want to resize the tiles to 100 x 100 px and have a picture as a grid background on 3 lines. In this case the picture is a perfect square of 300 x 300 px and sliced in to 9 images.


I paste the script below in to a script editor web part which I placed on the same page as the promoted links list.
<style type="text/css">
/* Body, keep big enough for the amount of tiles you want on a line - 3 lines */ .ms-promlink-body { height: 330px; }
/* Distance between tiles, grid lines*/ div.ms-tileview-tile-root { height: 102px !important; width: 102px !important; }
/* Image canvas, also modify the ms-tileview above */ div.ms-tileview-tile-content, div.ms-tileview-tile-detailsBox, div.ms-tileview-tile-content > a > div > span { height: 100px !important; width: 100px !important; }
/* EXPLAIN */ div.ms-tileview-tile-content > a > div > img { max-width: 100%; width: 100% !important; }
/* EXPLAIN */ ul.ms-tileview-tile-detailsListMedium { height: 100px; padding: 0; }
/* EXPLAIN */ li.ms-tileview-tile-descriptionMedium { font-size: 11px; line-height: 16px; }
/* EXPLAIN */ div.ms-tileview-tile-titleTextMediumExpanded, div.ms-tileview-tile-titleTextLargeCollapsed, div.ms-tileview-tile-titleTextLargeExpanded { padding: 3px; }
/* Text on the overlay header*/ div.ms-tileview-tile-titleTextMediumCollapsed { background: none repeat scroll 0 0 /* #002E4F */; font-size: 16px; line-height: 16px; min-height: 36px; min-width: 97px; padding-left: 3px; position: absolute; top: -36px; }
/* Inside description text*/ li.ms-tileview-tile-descriptionMedium { font-size: 11px; line-height: 14px; padding: 3px; }
/* EXPLAIN */ .ms-promlink-header{ display:none; } </style>
Fluffy example #2
In this example I wanted to have wide tiles, just 3 next to each other. Just by changing the width of the body to the size of one tile give me the result of a stacked list.


<style type="text/css">
/* Body, keep big enough for the amount of tiles you want on a line - 3 lines */ .ms-promlink-body { height: 100px; width: 630px; }
/* BG was larger than image by "right" class, this removes it */ .ms-promlink-body img{ right:inherit!important; }
/* Distance between tiles, grid lines */ div.ms-tileview-tile-root { height: 103px !important; width: 203px !important; }
/* Image canvas, also modify the ms-tileview above */ div.ms-tileview-tile-content, div.ms-tileview-tile-detailsBox, div.ms-tileview-tile-content > a > div > span { height: 100px !important; width: 200px !important; }
/* EXPLAIN */ div.ms-tileview-tile-content > a > div > img { max-width: 100%; width: 100% !important; }
/* EXPLAIN */ ul.ms-tileview-tile-detailsListMedium { height: 100px; padding: 0; }
/* EXPLAIN */ li.ms-tileview-tile-descriptionMedium { font-size: 11px; line-height: 16px; }
/* EXPLAIN */ div.ms-tileview-tile-titleTextMediumExpanded, div.ms-tileview-tile-titleTextLargeCollapsed, div.ms-tileview-tile-titleTextLargeExpanded { padding: 3px; }
/* Text and BG on the overlay header*/ div.ms-tileview-tile-titleTextMediumCollapsed { background: none repeat scroll 0 1 #002E4F; font-size: 16px; line-height: 48px; min-height: 36px; min-width: 198px; padding-left: 3px; position: absolute; top: -36px; }
/* Inside description text*/ li.ms-tileview-tile-descriptionMedium { font-size: 11px; line-height: 14px; padding: 3px; }
/* EXPLAIN */ .ms-promlink-header{ display:none; } </style>
If for some reason you want two promoted links lists on one page with different look and feel you can find the MSOZoneCell_WebPartWPQx with the IE Developer Tools DOM inspector.
By placing the codebelow with the right web part number within the <style> </style> tags it will only influence that specific targeted web part.
/* change only Web Part WPQx */ #MSOZoneCell_WebPartWPQx
Fluffy example #3
The people at Syncfusion give us a free tool Metro Studio to create nice Windows like tiles with. It's easy to create tiles but keep in mind that if you export it with a transparent background it needs to be a GIF. The default PNG will be converted to JPEG by SharePoint when you upload the images and you end up with a dark background.
Just as an example I modified the icon from the center to the top right with PowerPoint. I made a square shape and resized the icon. The new Snip tool part of Office Mix can be freely downloaded as well and used to cut out the tile.
With some script I modified the font a bit to make it look different than the normal one. Ofcourse you can use a custom font but if it's not on all your servers it will not display. Better to use a font installed by Microsoft which will be on any system.
Example: Normal tiles with a Metro Studio icon in the center.

Example: Modified font and a customized tile from PowerPoint.

<style type="text/css">
/* Body, keep big enough for the amount of tiles you want on a line - 3 lines */ .ms-promlink-body { height: 160px; width: 330px; }
/* BG was larger than image by "right" class, this removes it */ .ms-promlink-body img{ right:inherit!important; }
/* Distance between tiles, grid lines */ div.ms-tileview-tile-root { height: 165px !important; width: 165px !important; }
/* Image canvas, also modify the ms-tileview above */ div.ms-tileview-tile-content, div.ms-tileview-tile-detailsBox, div.ms-tileview-tile-content > a > div > span { height: 160px !important; width: 160px !important; }
/* EXPLAIN */ div.ms-tileview-tile-content > a > div > img { max-width: 100%; width: 100% !important; }
/* EXPLAIN */ ul.ms-tileview-tile-detailsListMedium { height: 100px; padding: 0; }
/* EXPLAIN */ li.ms-tileview-tile-descriptionMedium { font-size: 11px; line-height: 16px; }
/* EXPLAIN */ div.ms-tileview-tile-titleTextMediumExpanded, div.ms-tileview-tile-titleTextLargeCollapsed, div.ms-tileview-tile-titleTextLargeExpanded { padding: 3px; }
/* Text and BG on the overlay header*/ div.ms-tileview-tile-titleTextMediumCollapsed { background: none repeat scroll 0 0 #002E4F; font-size: 24px; font-family: "Rockwell"; color: #0072C6; line-height: 22px; min-height: 96px; min-width: 160px; padding-left: 5px; padding-top: 5px; position: absolute; top: 0px; }
/* Inside description text*/ li.ms-tileview-tile-descriptionMedium { font-size: 11px; line-height: 24px; padding: 3px; }
/* EXPLAIN */ .ms-promlink-header{ display:none; } </style>
There are some more cool examples on the internet but I hope this post helped you to get inspired and create some nice fluffiness and make the promoted links list more sexy from now on.

Comments